This chapter steps through the process of installing either Red Hat Enterprise Linux or Fedora Core. Frequently, the installation is quite simple, especially if you have done a good job of planning. Sometimes you may run into a problem or have a special circumstance; this chapter gives you the tools to use in these cases.
IN THIS CHAPTER
Booting the System: The boot: PromptChapter 2 covered planning the installation: requirements, an upgrade versus a clean installation, classes of installations, planning the layout of the hard disk, how to obtain the files you need for the installation including how to download and burn ISO (CD) images, and collecting the information about the system you will need during installation. This chapter steps through the process of installing either Red Hat Enterprise Linux or Fedora Core. Frequently, the installation is quite simple, especially if you have done a good job of planning. Sometimes you may run into a problem or have a special circumstance; this chapter gives you the tools to use in these cases.
The Anaconda Installer
Using Disk Druid to Partition the Disk
Setting Up a Dual-Boot System
The X Window System
system-config-display: Configuring the Display
More Information
Installing Red Hat Linux
To begin most installations, insert the first installation CD into the CD drive and turn on or reset the system. For hard disk and network-based installations, you can use the rescue CD (page 39) in place of the first installation CD.The system boots from the CD and displays a screen of instructions with a boot: prompt at the bottom. Refer to "BIOS setup" on page 25 if the system does not boot from the CD.
You cannot boot from a floppy diskette Because most kernels have grown too large to fit on a floppy diskette, you cannot boot from a floppy. You cannot fit a standard Fedora Core 2 (and later) kernel on a floppy diskette. You may be able to fit some Red Hat Enterprise Linux kernels on a diskette. Fedora gives you the option of booting from a USB pen drive using the diskboot.img file.
Booting the System: The boot: Prompt
Normal installation You can give many different commands at a boot: prompt. If you are installing from CDs, you can generally press RETURN without entering a command to start installing Red Hat Linux. Or you can just wait; if you do not type anything for a minute, the installation proceeds as though you pressed RETURN.Display problems If you have problems with the display during installation, give the following command, which turns off video memory, in response to the boot: prompt:
boot: linux nofbSELinux By default, Fedora is installed with SELinux (page 379) turned off. Unless you need a very secure system, you do not need to turn this feature on. Give the following command to install Fedora with SELinux turned on:
boot: linux selinuxWhen you give this command to install Fedora, the Firewall screen allows you to set up SELinux (Figure 3-5, page 51).
Non-CD installations If you are installing from other than CDs, that is, if you are installing from files on the local hard disk or from files on another system using FTP, NFS, or HTTP, give the following command in response to the boot: prompt:
boot: linux askmethodBooting As the system boots, text scrolls on the monitor, pausing occasionally. After a while (up to a few minutes, depending on the speed of the system), the installer displays a graphical or pseudographical display, depending on the system you are installing and the commands you gave at the boot: prompt.
The balance of this section covers the commands you can give in response to the boot: prompt. Unless you are having problems with the installation or have special requirements, you can skip to the next section, "The Anaconda Installer" on page 46.
Boot Commands
All the commands (except for memtest86) you can give in response to the boot: prompt consist of the word linux followed by an argument that is passed to the Anaconda installer. Many of the commands can be combined. For example, to install Linux in text mode using a terminal running at 115,200 baud, no parity, 8 bits, connected to the first serial device, give the following command (the ,115200n8 is optional):boot: linux text console=ttyS0,115200n8The next command installs Red Hat Linux in graphical mode (by default) on a monitor with a resolution of 1024x768, without probing for any devices. The installation program asks you to specify the source of the installation data (CD, FTP site, or other).
boot: linux resolution=1024x768 noprobe askmethodFollowing are some of the commands you can give at the boot: prompt. Each command must be terminated with RETURN.
RETURN Without entering a command, press RETURN in response to the boot: prompt to perform a graphical installation from CDs. This installation probes the computer to determine as much as possible about the hardware.
memtest86 FEDORA Calls memtest86 when you boot from a CD only. The GPL-licensed memtest86 utility is a standalone memory test for x86-based computers. Press C to configure the test, ESCAPE to exit. See www.memtest86.com for more information.
linux askmethod Gives you a choice of installation sources: local CD or hard drive or over a network using NFS, FTP, or HTTP.
- Local CD Displays the CD Found screen, which allows you to test the installation media (the same as if you had just pressed RETURN).
- Hard drive Prompts for the partition and directory that contains the ISO images of the installation CDs.
- NFS , FTP , or HTTP Displays the Configure TCP/IP screen from which you can select DHCP or enter the system's IP address, netmask, default gateway (IP), and primary nameserver.
linux mem= xxx M Overrides the detected memory size. Replace xxx with the number of megabytes of RAM in the computer.
linux mediacheck Tests one or more installation CDs using an MD5 sum. This option works with the CD, DVD, hard drive ISO, and NFS ISO installation methods. For more information, refer to "Check the CDs" on page 47.
FEDORA This test is performed automatically during a normal CD installation.
linux nofb no framebuffer Turns off the framebuffer (video memory). Useful when problems occur when the graphical phase of the installation starts. Particularly useful for systems with LCD displays.
linux noprobe Disables hardware probing for all devices, including network cards (NICs), graphics cards, and the monitor. Forces you to select devices from a list. You must know exactly which cards or chips the system uses when you use this command. Use when probing causes the installation to hang or otherwise fail. This command allows you to give arguments for each device driver you specify.
Linux rescue Puts the system in rescue mode; see page 377 for details.
linux resolution= WxH Specifies the resolution of the monitor you are using for a graphical installation. For example, resolution=1024x768 specifies a monitor with a resolution of 1024 by 768 pixels.
linux selinux FEDORA Enables SELinux (page 379) on the system you are installing. When you give this command to install Fedora, the Firewall screen allows you to set up SELinux (Figure 3-5, page 51).
linux skipddc Allows you to configure the monitor manually; see linux noprobe for more information.
linux text Installs Linux using pseudographical mode. Although the images on the screen appear to be graphical, they are composed entirely of text characters.
linux vnc FEDORA Installs over a VNC (Virtual Network Computing) remote desktop session. After providing an IP address, you can control the installation remotely using a VNC client from a remote computer. You can download the VNC client, which runs on several platforms, from www.realvnc.com.
The Anaconda Installer
Anaconda, the program that installs Red Hat Linux, is written in Python and C, identifies the hardware, builds the filesystems, and installs or upgrades the Red Hat Linux operating system. Anaconda can run in textual or graphical (default) interactive mode or in batch mode (see "Using the Kickstart Configurator" on page 57).Exactly which screens Anaconda displays depends on whether you are installing Fedora or Red Hat Enterprise Linux and which command(s) you specified following the boot: prompt (preceding). With some exceptions, notably if you are running a text-mode installation, Anaconda starts by probing the video card, monitor, and mouse and by starting a native X server with a log in /tmp/X.log. (This log is not preserved unless you complete the installation.)
While it is running, Anaconda opens the virtual consoles (page 103) shown in Table 3-1. You can display a virtual console by pressing CONTROL-ALT-F x where F x is the function key that corresponds to the virtual console number.
Table 3-1. Virtual Console Assignments During Installation
| 1 | Installation dialog |
| 2 | Shell |
| 3 | Installation log |
| 4 | System messages |
| 5 | Miscellaneous messages |
| 7 | GUI interactive installation |
Using Anaconda
Anaconda provides a NEXT button at the lower-right of each of the installation screens and a BACK button next to it on most screens. When you have completed the entries on an installation screen, click NEXT , or, from a text install, press the TAB key until the NEXT button is highlighted and then press RETURN. Select BACK to return to the previous screen.Initially, each of the graphical installation screens is divided into two columns: a narrow help column on the left and information and prompts about the installation on the right. Select the Hide Help button (lower-left) to remove the help column. Select Release Notes (next to Hide Help) to display the release notes for the version of Red Hat Linux you are installing.
Anaconda Screens
Following is a list of screens that Anaconda displays during a default installation. It may display different screens depending on what commands you give and choices you make.CD Found FEDORA Allows you to check as many installation CDs as you like, in any order. Choose OK to test the media, Skip to bypass the test. See the preceding TIP. This screen is displayed in pseudotext mode and does not appear in two columns. Use the TAB key to move between choices; press RETURN to select the highlighted choice.
During a graphical installation, when you leave the CD Found screen, Anaconda displays messages telling you it is probing for the devices it will use during installation. After probing, it starts the X server.
Welcome Displayed after Anaconda obtains enough information to start the X Window System. There is nothing for you to do on this screen except hide the help panel and display the release notes. Select NEXT.
Language Selection Select the language you want to use for the installation. This language is not necessarily the same language that the installed system displays.
Keyboard Configuration Select the type of keyboard attached to the system.
Mouse Displayed only if the type of mouse cannot be determined. Select the type of mouse attached to the system. Mark the Emulate 3 buttons box if you have a two-button mouse and want the system to respond as though you had pressed the middle button when you press the two mouse buttons at the same time.
Monitor FEDORA Displayed only if the monitor cannot be probed successfully. Select the brand and model of the monitor attached to the system. Select a generic LCD or CRT display if the monitor is not listed. You can specify the Sync frequencies in place of the monitor brand and model, but be careful: Specifying the wrong values can ruin some older hardware.
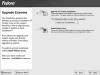
Upgrade Examine If it detects a version of Red Hat Linux on the hard disk that it can upgrade, Anaconda gives you the choice of upgrading the existing installation or overwriting the existing installation with a new one (Figure 3-1). Refer to "Installing a Fresh Copy or Upgrading an Existing Red Hat System?" on page 26 for help in making this selection.
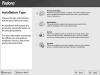
Installation Type FEDORA Select the type of installation you want (Figure 3-2): Personal Desktop, Workstation, Server, or Custom. Refer to "Types of Installations (FEDORA)" on page 27 for help in answering this question.
Disk Partitioning Setup Select Automatically partition or Manually partition with Disk Druid. The automatic selection gives you the option of reviewing and changing the partitions Anaconda sets up. For more information, refer to "Using Disk Druid to Partition the Disk" on page 53.
Boot Loader Configuration By default, Anaconda installs the grub boot loader (page 514). If you do not want to install a boot loader, click Change boot loader and select Do not install a boot loader. When you install Red Hat Linux on a machine that already runs another operating system, Anaconda frequently recognizes the other operating system and sets up grub so you can boot from either operating system. Refer to "Setting Up a Dual-Boot System" on page 61. You can manually add other operating systems to grub's list of bootable systems by clicking Add and specifying a label and device to boot from. For a more secure system, specify a boot loader password.
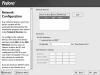
Network Configuration Specify network configuration information (Figure 3-3). This screen has three frames: Network Devices, Hostname, and Miscellaneous Settings. If you are using DHCP to set up the network interface, you do not need to change anything.
The Network Devices frame lists the network devices the installer knows about. Normally, you want network devices to become active when the system boots; remove the mark from the check box at the left of a device if you do not want it to become active when the system boots.
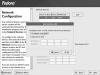
To configure a network device manually (not using DHCP), highlight the device and click Edit to the right of the list of devices. Anaconda displays the Edit Interface window (Figure 3-4). Remove the mark from the Configure using DHCP check box and enter the IP address and netmask in the appropriate boxes before clicking OK.
If you are not using DHCP, click manually under Set the hostname and enter the name of the system. When you turn off DHCP configuration in Network Devices, Anaconda allows you to specify a gateway address, and one or more DNS (name-server) addresses. You do not have to specify more than one DNS address, although it can be useful to have two in case one nameserver stops working. Click Next.
Firewall Set up a firewall (Figure 3-5). First, select No firewall or Enable firewall. If you select Enable firewall, select the services that you want the firewall to allow to pass through to the system. Selecting WWW (HTTP) does not allow HTTPS (secure HTTP), which is used for secure browser connections to financial institutions and when giving credit card information, through the firewall. Specify https:tcp in Other ports to allow secure HTTP to pass. If you have multiple network devices (one of which may be a dial-up line), you may want to consider one of them to be trusted. Never trust a device connected to the Internet. Put a mark in the check box next to any trusted devices in the box labeled If you would like to allow all traffic from a device, select it below. If Anaconda displays the SELinux combo box shown in Figure 3-5, select the state you want SELinux (page 379) to be in when you start the system. The chapter on iptables (page 737) has information on how to build a more complete and functional firewall.
Additional Language Support Select languages that the installed system will support. The default language is the language the system will boot up in. Select as many other languages as you like from the list.

Time Zone Specify the time zone the system is located in. Click on a location on the map or scroll through the list and highlight the appropriate selection. Put a mark in the check box if your system clock is set to UTC (page 1004).
Root Password Specify the root password.
After you specify the root password, Anaconda pauses to read the software package information.
Package Installation Defaults In this screen, Anaconda lists the packages it will install by default. Choose Install default software packages to install this list of packages or Customize software packages to be installed to modify the list. Regardless of your selection, you can change which packages are installed on a system at any time; refer to "system-config-packages: Adds and Removes Software Packages" on page 453.
Package Group Selection If you choose to accept the default list of software packages (previous screen), Anaconda skips this screen. Select the groups and packages you want to install. For more information, refer to "system-config-packages: Adds and Removes Software Packages" on page 453.
About to Install Anaconda displays the About to Install screen just before it starts installing Red Hat Linux on the hard disk.
Installing After you press NEXT, Anaconda installs Red Hat Linux. Depending on the number of software packages you are installing, this process can take quite a while. Anaconda keeps you informed of its progress and requests CDs (if you are installing from CDs) as it needs them.
When You Reboot
When Anaconda instructs you to do so, remove the installation CD if present and reboot the system. The system boots Red Hat Linux and asks a few questions before allowing you to log in.License Agreement First, Anaconda displays the Welcome screen, followed by the License Agreement screen. Select Yes I agree to the License Agreement if you agree with the terms of the licence agreement.
Date and time The next screen allows you to set the date and time. Running the Network Time Protocol (NTP) causes the system clock to reset itself periodically from a clock on the Internet. If the system is connected to the Internet, you may want to select Enable Network Time Protocol and choose a server from the combo box.
Display Next, Anaconda displays the Display screen, which allows you to specify the resolution and color depth of the monitor.
User Account The next screen allows you to set up user accounts. You can set up user accounts now or once the system is fully operational. For more information, refer to "Configuring User and Group Accounts" on page 521.
Sound Card The Sound Card window identifies the sound card and has a button that can play a test sound. There is nothing that you can configure from the Sound Card window.
Additional CDs Next, the system asks if you have additional CDs for installing more software packages.
Finish Setup Finally, from the Finish Setup screen, click NEXT to complete the setup and display the login screen.
When you leave the Finish Setup screen, you are done with the installation. You can use the system and set it up as you desire. You may want to customize the desktop as explained in Chapters 4 and 8 or set up servers as discussed in Part V of this book.
Initializing Databases
After booting the system, log in as, or su to, root and update the whatis database so that whatis (page 137) and apropos (page 137) work properly. Then update the slocate database so that slocate works properly. (The slocate [secure locate] utility allows you to index and search for files on your system quickly and securely.) Instead of updating these databases when you install the system, you can wait for cron to run them overnight, but whatis, apropos, and slocate will not work until the next day. The best way to update these databases is to run the cron scripts that run them daily. Working as root, give the following commands:# /etc/cron.daily/makewhatis.cron # /etc/cron.daily/slocate.cronThese utilities run for up to several minutes and may complain about not being able to find a file or two. When you get the prompt back, your whatis and slocate data-bases are up-to-date.
No comments:
Post a Comment
Give your feedback here......